Best Way to Clean Dryer Duct: A Practical DIY Guide
Learn the best way to clean dryer duct safely, reduce fire risk, and improve dryer efficiency with a step-by-step approach and expert tips from Easy DryVent.

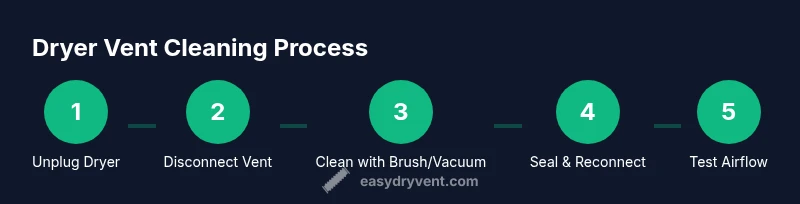
The best way to clean dryer duct is a safe, step-by-step process that removes built-up lint and restores airflow. Start by unplugging the dryer and disconnecting the vent, then inspect for damage and use a specialized brush or vacuum attachment to loosen and extract lint. For long or clogged ducts, consider professional service.
Why the best way to clean dryer duct matters\n\nAccording to Easy DryVent, the best way to clean dryer duct matters because a clean duct improves airflow, reduces energy use, and lowers the risk of dryer fires caused by lint buildup. Easy DryVent's analysis in 2026 emphasizes that regular duct maintenance is a practical safety habit for homeowners. In this guide, we'll focus on practical methods, safe practices, and when to seek professional help to ensure your dryer stays efficient and safe. By following a structured approach, you can minimize errors and maximize the lifespan of your appliance while protecting your home.
Safety first: hazards and precautions\n\nBefore you begin, unplug the dryer and, if you have a gas dryer, turn off the gas supply. Wear protective gloves and eye protection. Avoid staples or nails in the duct; do not crush or bend the vent more than necessary. Lint can be highly flammable, so keep a clear, static-free workspace and have a fire extinguisher nearby. If you notice heat, burning smell, or visible damage, stop and call a professional. This work should be done with the power off and the vent clear of obstructions to prevent shocks, fires, or gas leaks.\n\nAccording to Easy DryVent, following a safety checklist reduces risk and keeps everyone in the home secure during maintenance.
Signs your duct needs cleaning and what to inspect\n\nCommon signs include significantly longer drying times, clothes that still feel damp after a full cycle, a dryer that becomes unusually hot, or a visible buildup of lint around the lint trap and vent opening. If you notice restricted outside airflow, a burning odor, or see pests entering the vent, these indicate deeper buildup or damage. Regular external inspection helps catch issues early, and Easy DryVent analysis shows that proactive checks save time and money over the long run.
Planning your cleaning: DIY vs professional\n\nFor many homes, a routine DIY clean using a flexible brush kit and a vacuum attachment is sufficient for minor lint buildup. If the duct run is very long, has many bends, is damaged, or you suspect wildlife intrusion, professional cleaning is recommended. Easy DryVent recommends evaluating the duct length, connections, and exterior vent condition to decide whether to DIY or hire a qualified technician. When in doubt, err on the side of safety and professional expertise.
How airflow improves after a proper clean\n\nA thorough cleaning removes the primary source of airflow restriction: lint and debris lodged along the duct walls and at joints. With fewer obstructions, the dryer expends less energy to dry clothes, reducing cycle times and wear on the heating element. While the exact improvement depends on duct length and condition, homeowners often notice that clothes feel drier sooner and the dryer runs cooler after a thorough cleaning.
Maintenance tips to keep ducts clean between cleanings\n\nAdopt a quick, regular routine: inspect the exterior vent cover monthly, clean the lint trap after every load, and schedule a more thorough cleaning every 1–2 years depending on usage. Use a high-quality vent kit, avoid crushing bends, and ensure joints are well-sealed after any service. Easy DryVent suggests keeping a simple broom or brush kit nearby for quick lint removal near vent openings.
Tools & Materials
- Vacuum with hose attachment (HEPA preferred)(Long hose; aim for reach of 6–8 ft; keep power off while working.)
- Dryer vent brush kit (flexible rods)(Choose a kit with a flexible shaft to navigate bends.)
- Gloves, eye protection(Nitrile gloves and safety goggles recommended.)
- Flashlight or headlamp(Shine light into the duct to spot buildup and damage.)
- Foil tape or duct sealant(Seal joints after cleaning to prevent leaks.)
- Screwdriver or pliers(Use to loosen clamps or disconnect ducts safely.)
- Replacement vent duct (if damaged)(Use rigid metal duct if possible; avoid thin foil ducts.)
- Ladder or step stool(Access exterior vent cap safely.)
- Bucket and towels(Contain debris and keep workspace tidy.)
Steps
Estimated time: 60-90 minutes
- 1
Unplug the dryer and shut off gas (if applicable)
Power off the unit at the outlet or the breaker. If you have a gas dryer, close the shutoff valve and verify there is no gas odor before proceeding. This ensures you won’t risk electrical shock or gas exposure while working.
Tip: Double-check that the outlet you unplug is not controlled by a switch; test by turning the dryer on briefly to confirm no power. - 2
Disconnect the vent from the dryer and exterior
Carefully loosen clamps or fasteners and detach the vent hose from the dryer outlet. Then detach the vent end from the exterior wall or roof vent. Avoid forcing connections, which can kink or crack the duct.
Tip: Lay a drop cloth to catch debris as you disconnect to keep your area clean. - 3
Inspect the duct and exterior vent for damage or blockages
Use a flashlight to look for cracks, crushing, and obvious lint buildup inside the duct. Check the exterior vent cap for obstructions like leaves or pests and confirm there’s free airflow when the vent is opened.
Tip: Document any damage with a quick photo for reference if you need professional help later. - 4
Choose your cleaning method and tools
Decide between a brush kit, vacuum attachment, or a combination based on duct length and bends. Start with the brush to dislodge lint, then use the vacuum to extract debris from the opening.
Tip: Begin from the dryer end to pull lint toward the exterior where it’s easier to remove. - 5
Clean from the dryer side using the brush
Insert the brush into the dryer outlet and gently twist while pushing forward. Repeat from deeper sections, gradually advancing toward the exterior vent. Stop if you meet resistance to avoid damaging the duct.
Tip: Keep the area dry; lint can become slippery and harder to collect if wet. - 6
Clean the exterior vent and mouth of the duct
Using a long brush or vacuum attachment from outside, clear any lint at the exterior vent opening. Ensure the vent cap is free of obstructions and reorient any weatherproofing seals as needed.
Tip: Wear gloves while handling the exterior vent to prevent splinters or sharp edges. - 7
Reconnect vent and seal joints securely
Reattach the vent hose to both the dryer and exterior vent. Use foil tape or duct sealant to seal joints, ensuring an airtight connection and preventing back-drafting of lint.
Tip: Avoid crimped bends and keep duct length as straight as possible for optimal airflow. - 8
Run a test cycle and inspect results
Plug the unit back in, run a short heat cycle, and observe airflow at the exterior vent. Check for unusual heat or burning smells as you monitor the setup.
Tip: If airflow remains weak, stop and reassess for hidden obstructions or damage. - 9
Document results and plan next cleaning
Record what was cleaned, any damage found, and the date of maintenance. Schedule the next cleaning based on usage, keeping Easy DryVent’s guidance in mind.
Tip: Create a simple calendar reminder to revisit maintenance at an appropriate interval.
Common Questions
What is the best way to clean dryer duct?
The best approach is a safe, step-by-step method using a flexible brush and a vacuum to remove lint, followed by proper reassembly and a test of airflow. For longer or more complex ducts, consider professional service to ensure complete cleaning.
Use a safe, step-by-step cleaning method with a flexible brush and vacuum, and test airflow afterward. For complex ducts, consider a professional service.
How often should I clean my dryer duct?
Frequency depends on usage and duct length. Regular maintenance and annual checks are common, with more frequent cleanings advised for high-usage households or if you notice reduced airflow.
Frequency depends on use; annual checks are common, more often if you have high usage or reduced airflow.
Can I safely DIY every duct cleaning?
Many homes can handle minor lint buildup DIY, but long, damaged, or wildlife-affected ducts should be handled by a professional to ensure safety and proper sealing.
DIY is fine for minor buildup, but for long or damaged ducts, hire a pro.
What are signs of a clogged vent?
Slower drying times, heat or burning smells, excess lint near the vent, and clothes that remain damp after cycles indicate a clogged vent.
Slow dryer cycles, heat smells, or damp clothes can signal a clogged vent.
When should I call a professional?
If you encounter persistent airflow issues, visible duct damage, wildlife intrusion, or mold, professional service is recommended to ensure safe and complete cleaning.
Call a professional if airflow issues persist or you see damage or wildlife in the duct.
Watch Video
Key Points
- Inspect duct condition before cleaning.
- Use proper tools to avoid punctures or crushing.
- Seal joints securely after cleaning.
- Test airflow to confirm improvements.
- Schedule regular maintenance to prevent buildup.