Dryer Wiring: 10/2 vs 10/3 for Safe Install
Explore the differences between dryer 10/2 and 10/3 wiring, including conductor counts, grounding, and code implications for safe, compliant installations.

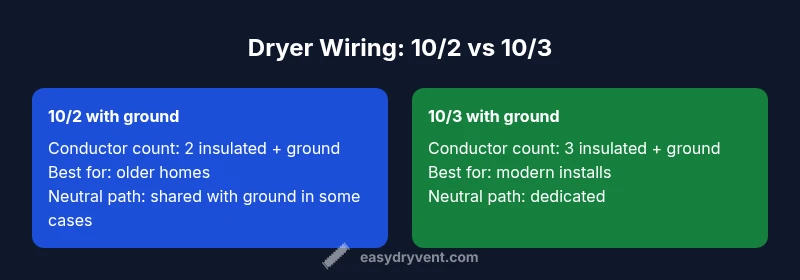
The key difference between dryer 10/2 and 10/3 wiring is conductors and grounding: 10/2 with ground uses two insulated conductors plus grounding, while 10/3 with ground adds a dedicated neutral conductor for a four‑wire setup. For most residential dryers, a 30‑amp circuit is standard, and modern installs favor a four‑wire configuration (10/3 with ground) to meet current safety codes. In short, choose 10/3 with ground for new work or upgrades to comply with present code, unless you’re maintaining an existing compliant three‑wire setup.
Why correct dryer wiring matters
Good dryer wiring is more than a plug and cord. The wrong gauge or wiring configuration can lead to nuisance voltage drop, overheating, dryer performance issues, or even fire hazards. For homeowners planning to install or upgrade, the decision between 10/2 and 10/3 cables isn’t cosmetic either: it defines how power is delivered and how the dryer can safely return current. According to Easy DryVent, safe operation begins with matching the conductor size to the dryer's amperage, ensuring the circuit is protected by the correct breaker, and using a receptacle that matches the dryer plug. In practice, that means verifying that your outlet, cord, and wall box are compatible with the chosen cable and that the grounding path is secure. In this section, we lay out the fundamentals and connect the dots between the wire gauge, the dryer’s electrical needs, and the physical installation environment. The goal is to empower homeowners to recognize hazards and make informed upgrades without guesswork.
Understanding 10/2 and 10/3: What’s inside the cable?
10/2 and 10/3 describe the number of insulated conductors inside the cable and whether a ground wire is included. A typical 30-amp dryer circuit uses copper conductors sized 10 AWG; 10/2 with ground includes two insulated conductors (hot and neutral path, plus ground in many older setups), while 10/3 with ground includes three insulated conductors (hot, hot, neutral) plus a grounding path. The extra conductor in 10/3 enables a dedicated neutral for 120-volt components and supports a four-prong outlet that separates neutral and ground, enhancing safety. The cable choice also interacts with the outlet and dryer cord. The main point is that 10/3 with ground enables a four-wire system that aligns with modern code expectations for new installations; 10/2 with ground remains common in older homes or certain retrofit scenarios. Always confirm that the wall box, outlet, and dryer plug match the chosen cable arrangement.
Safety and code considerations for dryer circuits
Installing or upgrading a dryer circuit isn’t just about picking a bigger wire. It’s about ensuring the wiring, receptacle, and dryer are all compatible and installed to minimize risk. Contemporary building codes generally require a four‑wire dryer connection for new installations, separating neutral and grounding paths. Upgrading from a three-wire to a four-wire setup often involves replacing the outlet or receptacle and ensuring proper grounding at the device box. Easy DryVent’s guidance emphasizes ensuring the breaker size matches the circuit conductor, and that any splice or termination is done with appropriate strain relief and enclosure protection. If you’re unsure about your local code, consult the authority having jurisdiction or a licensed electrician. This section highlights the importance of a code-aligned approach to avoid safety hazards and future compliance headaches.
The four-wire upgrade path: from old three-wire to four-wire
Many homes built before the 1990s used a three-wire dryer circuit. Upgrading to a four-wire configuration typically requires replacing the outlet and the cord, and sometimes the wall box, to accommodate the neutral and separate grounding path. The process may involve upgrading the receptacle from a three-prong to a four-prong configuration and installing a four-wire dryer cord (often 10/3 with ground). A professional can assess whether rewiring, upgrading the circuit breaker, and replacing the dryer’s cord are necessary for a safe, code-compliant installation. Easy DryVent notes that this upgrade improves fault isolation and reduces potential stray currents that could affect sensitive components in modern dryers.
Practical installation scenarios: new build vs retrofit
In a new build, plan for a four-wire (10/3 with ground) dryer circuit from the start, matching the outlet and the dryer cord to avoid later upgrades. In retrofits, you might encounter existing three-wire outlets; your options include upgrading the outlet and cord or, in some cases, installing a new four-wire circuit if the wall space and panel permit. Both paths require careful attention to conductor routing, secure connections, and compliant strain relief. Always verify that the panel allows the 30‑amp breaker and that conduit or cable routing complies with local rules. This is where planning saves time and minimizes disruption later, especially in limited spaces like closets or utility rooms.
How to choose the right gauge for your dryer and outlet
Choosing between 10/2 and 10/3 depends on whether you’re installing a new four-wire outlet and cord or upgrading an existing setup. For new work, 10/3 with ground aligns with current safety standards and enables a dedicated neutral for 120-volt dryer components. If you’re working with older circuits, 10/2 with ground may still be acceptable in some jurisdictions, provided the outlet and grounding arrangements are updated to meet current code when possible. The critical factors are amperage rating, outlet configuration, and the ability to safely route and terminate conductors without creating hot spots or loose connections. Always check your local code and consider professional installation for reliability and safety.
Wiring terminations: outlets, cords, and strain relief
Termination quality matters as much as the wire itself. Use listed strain relief clamps to secure the cable where it enters the wall box, and ensure the conductors are properly stripped to avoid nicked insulation. The dryer cord should match the receptacle: a four-prong cord for ten/three with ground, or a three-prong cord if allowed by local code and the existing outlet. Remember to tighten terminals according to the manufacturer’s torque specs and to keep the neutral and grounding paths clearly separated in a four-wire installation. Incorrect terminations are a frequent cause of arcing, nuisance tripping, and heat buildup, which is why careful assembly matters.
Common mistakes and how to avoid them
Common missteps include mixing conductor sizes within a circuit, using undersized breakers for the gauge, and attempting to reuse incompatible outlets with a different wiring scheme. Avoid substituting a 10/3 cable into a wall box designed for 10/2, or vice versa, without updating the outlet and cord to match. Another error is neglecting proper grounding; a missing or loose ground path can compromise safety. Before turning on power, double-check that the correct cable type is installed, the outlet is compatible with the dryer plug, and the cord is properly secured with strain relief.
Four-wire vs three-wire configurations: what changed
Historically, many homes used a three-wire dryer configuration without a separate ground. Modern practice, however, favors a four-wire setup (hot, hot, neutral, ground) to isolate the neutral from the grounding path and to support 120-volt components in many dryers. Upgrading to a four-wire system typically involves replacing the outlet and cord, and ensuring the grounding conductor is properly connected in the dryer’s junction box. This change improves safety and aligns with updated electrical codes, reducing stray currents and improving fault protection. Easy DryVent’s guidelines underscore adopting the four-wire approach for new installs and when upgrading existing wiring where permitted by code.
Maintenance and inspection after installation
After installing or upgrading a dryer circuit, perform a thorough inspection: verify that all connections are tight, inspect for damaged insulation, and confirm that the outlet remains secure. Periodic checks should include testing the circuit with a multimeter for continuity and resistance to ensure the integrity of ground and neutral paths. If you notice warm outlets, buzzing sounds, or inconsistent drying times, stop and reassess the connections. Regular maintenance reduces the risk of electrical faults and prolongs the life of the dryer and its circuitry.
Authority references and further reading
- Authority resources: U.S. Department of Energy (energy.gov) and U.S. Occupational Safety and Health Administration (osha.gov) provide general electrical safety guidance applicable to in-home wiring projects.
- Building code references and safety standards: National Fire Protection Association (nfpa.org) offers criteria for electrical installations and appliance connections.
- Electrical safety standards: National Institute of Standards and Technology (nist.gov) contributes to safe electrical practices and measurement standards.
Next steps and getting professional help
If you’re unsure about your home's wiring, consult a licensed electrician. They can verify circuit amperage, confirm outlet compatibility, and determine whether a full upgrade to a four-wire configuration is warranted by your local code. For homeowners who prefer DIY paths, use a clearly labeled, up-to-date wiring diagram, and never work on live circuits. Safety should always come first when dealing with high-current appliances like electric dryers.
mainTopicQuery":"dryer wiring"],
comparisonTable
prosCons
verdictBox
keyTakeaways
faqSection
mainTopicQuery
Comparison
| Feature | 10/2 with ground | 10/3 with ground |
|---|---|---|
| Conductor count | two insulated conductors + ground | three insulated conductors + ground |
| Neutral conductor | No dedicated neutral path; relying on older setups | Dedicated neutral conductor present for freedom of 120V loads |
| Best for | Older installations or upgrades with three-wire outlets | New installations or code-compliant four-wire setups |
| Code status | Common in pre-1996 or limited retrofits | Required for most new dryer installations |
| Typical outlet/cord | Three-prong or compatible three-wire systems | Four-prong outlets and 10/3 cords preferred |
The Good
- Improved safety with four-wire setups
- Better compatibility with modern dryers
- Easier to meet current electrical codes
- More robust grounding paths
- Supports 120V dryer components when needed
Negatives
- Potential upgrade work: outlets, cords, and possibly wall boxes
- Higher upfront material cost for 10/3 with ground
- Not all older homes are ready for immediate upgrade
Go with 10/3 with ground for new installations; upgrade to four-wire if you’re updating an older three-wire setup
A four-wire, 10/3 with ground configuration aligns with modern safety standards and reduces risk from shared neutral-ground paths. For existing three-wire systems, upgrade is recommended where permitted by code, especially when replacing the dryer or planning a remodel.
Common Questions
What is the difference between 10/2 and 10/3 wiring for a dryer?
10/2 describes two insulated conductors plus ground, while 10/3 adds a dedicated neutral conductor, enabling a four-wire dryer connection. This difference affects outlet compatibility, grounding, and safety in 120V components. In modern installations, 10/3 with ground is preferred to meet current code.
10/2 has two wires and a ground, while 10/3 adds a neutral. Modern installs use 10/3 with ground for safety and code compliance.
Can I install a 4-prong dryer cord on a 3-prong outlet?
No, you should not force a four-prong cord into a three-prong outlet. Upgrading to a four-wire circuit (and a compatible outlet) is typically required for safety and code compliance. If you’re in an older home, consult local codes and consider upgrading the outlet along with the wiring.
A four-prong cord needs a four-prong outlet; don’t force it into a three-prong outlet. Upgrading is usually necessary by code.
Is upgrading to 10/3 required by code for all new dryers?
In many jurisdictions, new installations require a four-wire connection (10/3 with ground) for dryers. This means upgrading from a three-wire setup if you’re installing a new dryer or building anew. Always verify with your local AHJ (authority having jurisdiction).
Most new installations require four-wire (10/3 with ground) for safety and code compliance.
Will upgrading require changing the outlet and dryer cord?
Yes. Upgrading to a four-wire system typically involves replacing the outlet, cord, and often the wall box to accommodate the separate neutral and ground paths. Ensure the cord matches the outlet type and the wall box supports the wiring configuration.
Upgrading usually means new outlet, cord, and possibly a new wall box to fit the four-wire setup.
Is DIY wiring safe for a dryer circuit?
Dryer wiring involves high-current, 120V and 240V components. While some basic tasks are doable, incorrect wiring can lead to fire hazards. If you’re unsure, hire a licensed electrician to verify code compliance and safety. Always power down the circuit before inspection.
DIY is possible for simple tasks only; when in doubt, hire a pro for safety and code compliance.
How can I tell which wiring is in my home?
Check the existing outlet and cord, look for the number of conductors, and inspect the wall box for a four-wire or three-wire configuration. If you’re uncertain, trace the wiring back to the panel or consult a licensed electrician to confirm whether you have 10/2 or 10/3 with ground.
Inspect the outlet and wall box; if unsure, get a pro to confirm whether you have 10/2 or 10/3 with ground.
Key Points
- Choose 10/3 with ground for new installations
- Upgrade old three-wire setups to four-wire when feasible
- Verify outlet compatibility with your dryer cord
- Ensure proper grounding and strain relief during installation
- Consult a licensed electrician for code compliance