Dimensions of a Dryer: Sizing, Fit, and Installation Guide
Learn how to measure and compare the dimensions of a dryer, plan for space, venting, and safe installation with practical tips for homeowners and DIY enthusiasts.

Dimensions of a dryer refers to the cabinet height, width, and depth, plus the required clearances for venting and door swing. For installation success, measure the space and compare the model’s exterior footprint. The Easy DryVent team emphasizes checking the vent path, door clearance, and any stacking or closet constraints before purchase.
Why the dimensions of a dryer matter for fit and ventilation
Choosing a dryer isn't just about capacity or energy use; it hinges on whether the exterior footprint fits your space and allows safe venting. The dimensions of a dryer determine door swing, lint trap access, and how much room you have for a bulky exhaust hose. In cramped laundry areas, even a model with ideal capacity can be a poor fit if its height or depth clashes with shelving, cabinets, or a stacked-unit configuration. According to Easy DryVent, taking precise exterior measurements before buying helps prevent costly returns and awkward installations. Pay attention to the overall height including feet, the width across the control panel, and the depth from the back vent connection to the leading edge of the door. Ground-truth your measurements with the actual model you’re considering, not just the advertised capacity. A little extra clearance can save you from cramming a plug, vent duct, or laundry baskets into tight spaces.
- Start with a quick sketch of your space showing the location of outlets, vents, and adjacent cabinetry.
- Measure ceiling height, floor-to-wall clearance, and the door swing path to ensure unobstructed operation.
- Check the model’s official exterior footprint (height x width x depth) rather than relying on internal capacity numbers.
The Easy DryVent team often sees projects where the wrong footprint leads to vent kinks or doors that won’t open fully. Planning for the dimensions of a dryer up front reduces installation surprises and improves overall safety.
Standard dryer dimensions and what to expect
Most residential dryers share a similar exterior footprint, but subtle differences in height, width, and depth can impact fit and ventilation. Typical exterior dimensions allow standard laundry areas to accommodate a range of models, but interior layout—especially in small apartments or closets—can require a more compact footprint or a stacked configuration. In practice, you’ll encounter heights ranging roughly from the low 30s to the low 40s inches, widths around the mid-20s to low-30s inches, and depths that balance drum capacity with venting space. While capacity ratings tell you how much you can load, only the exterior dimensions reveal whether the unit clears cabinets, doors, and the wall vent. When shopping, compare the external measurements across models with similar capacity and energy use. If you’re upgrading an older unit, verify that the new model’s footprint aligns with the existing alcove or laundry closet dimensions. Easy DryVent’s analysis highlights that a consistent footprint helps maintain uniform ventilation paths and reduces installation variability. You’ll also find differences in depth due to rear vent configurations and any rear exhaust panels, so always factor protrusions into your planning.
- Exterior height affects ceiling clearance and top-mounted shelving.
- Exterior width determines space between adjacent appliances or walls.
- Exterior depth influences venting clearance and behind-space accessibility for maintenance.
Knowing the typical exterior dimensions helps homeowners evaluate multiple models quickly and avoid mismatches during installation. This approach is especially valuable when you’re balancing capacity against cabinet space and door clearance, ensuring you get the most functional layout for your home.
How to measure for installation and clearance
Accurate measurements are the backbone of a successful dryer installation. Start by measuring the planned installation envelope: height from floor to ceiling, width between any adjacent cabinetry or walls, and depth from the rear wall to the front-dryer face. Don’t forget to measure door swing clearance, and consider any protrusions from the vent, power cord, or lint trap door that reduce usable space. If you’re stacking or placing the dryer in a closet, you’ll also need to account for an optional stacking kit and the closet’s venting path. A practical rule is to leave at least a few inches of clearance on all sides for airflow and maintenance access, plus additional space behind the unit for venting. In spaces with tight tolerances, you may need to adjust cabinet trim or relocate vent modules to maintain safe clearances. Always verify the model’s exterior footprint from the manufacturer’s specification sheet and cross-check it against your measured space.
- Measure in inches for all three dimensions (H x W x D).
- Verify the vent outlet location and the length of the exhaust hose.
- Confirm there is a clear path for air to escape without obstructions.
The quickest way to prevent a mismatch is to create a simple “fit map” before you shop: write down the exact height, width, and depth you have available, add 2-3 inches of clearance on each side for ducting and airflow, and compare these numbers against the dryer’s published exterior footprint. This disciplined approach aligns with Easy DryVent’s practical guidance on safe, efficient drying.
Door swing, vent paths, and space planning
Door swing can dramatically affect how you place a dryer in tight spaces. If a front-loading door opens toward a wall or a cabinet, you may need a shallower unit or a different orientation (front-vent vs. side-vent). In addition, vent paths should be as straight and short as possible to reduce lint buildup and backpressure, which can affect drying performance. The dimensions of a dryer influence how much room you need for a smooth vent run, including elbows, reducers, and any transition components. When space is scarce, consider compact or stackable models that maintain acceptable exterior dimensions while preserving an efficient vent route. If you plan to place the dryer in a closet, ensure there is adequate clearance above the unit for heat dissipation and access to the lint screen. Remember to account for the length of the vent hose and the potential need for an exterior vent cap or vent hood. Easy DryVent’s observations show that careful planning of door swing and vent routing reduces service calls and improves long-term performance.
- Map the vent path before installation, avoiding tight bends.
- Check that the chosen model’s door swing aligns with the available clearance.
- Plan for lint filter access and routine maintenance without obstruction.
Practical examples: apartments, basements, and laundry closets
Different living spaces demand different exterior footprints and venting strategies. In an apartment, you may face narrower alcoves or shared ventilation constraints, which pushes you toward compact or stackable models with slimmer footprints. In basements or homes with limited vertical space, consider models with adjustable feet and clear vent paths that won’t collide with joists or pipes. In laundry closets, ensure the door swing doesn’t collide with shelving or adjacent doors, and verify that the vent run can exit to the exterior without kinks or sharp angles. The dimensions of a dryer matter in every scenario because a mismatch between the unit’s footprint and your space can lead to compromised airflow, longer drying times, and higher energy use. Easy DryVent’s field notes consistently show that a thoughtful assessment of room layout, vent routing, and access points translates into real-world benefits: faster cycles, safer operation, and easier maintenance.
- For tight apartments, prioritize compact or stacked configurations.
- In basements, plan for vertical exhausts and away-from-humidity zones.
- In closets, maintain clearances for doors, lint tray access, and vent cleaning.
How to choose models based on footprint and opening clearance: a buyer’s checklist
When evaluating models, create a quick checklist focused on exterior dimensions and opening clearance. Start with the model’s stated height, width, and depth, then verify the door swing angle and any protrusions from the lint filter housing or rear vent. Compare these numbers to your space measurements, not just the internal drum capacity. Consider potential future changes in your laundry layout, such as adding a shelf or a stacking unit, and ensure the dimensions align with long-term needs. A useful approach is to draft a simple grid: column for space available, column for model exterior footprint, and a column for required clearances. If you’re replacing an older unit, take the opportunity to re-check the vent path and ensure your exterior vent hood is appropriate for the new model. According to Easy DryVent, aligning dimensions with your space reduces the likelihood of installation delays and ensures better performance and safety.
Common pitfalls and a quick-sizing checklist
Common pitfalls include underestimating depth due to rear vent protrusions, misjudging door clearance in tight rooms, and neglecting to account for the vent path’s impact on airflow. A quick-sizing checklist can save time and avoid returns: (1) measure H x W x D and compare to model specs, (2) confirm door swing path and final clearance, (3) blueprint vent route with minimal bends, (4) ensure there is adequate space for lint removal and maintenance, (5) verify that the chosen space supports both the unit’s weight and vibration requirements during operation. Following these steps helps you select a model whose exterior dimensions align with your living space, while still meeting performance and safety standards.
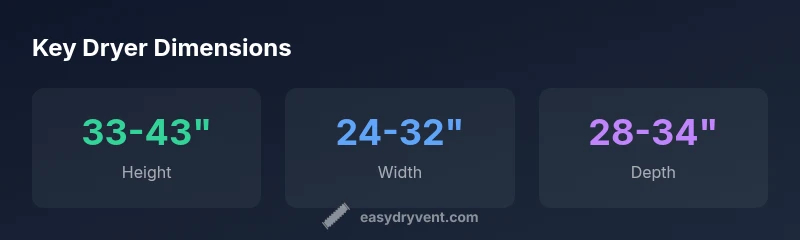
Representative exterior dimensions and installation considerations for residential clothes dryers
| Dimension | Typical Installed Range | Notes |
|---|---|---|
| Height | 33-43 inches | Depends on feet and model family |
| Width | 24-32 inches | Measured outside including trim |
| Depth | 28-34 inches | Rear vent and hose protrusions vary |
| Door swing clearance | Varies by door type | Measure path and consider stacking |
| Vent path length | Varies by layout | Prefer straight runs with minimal elbows |
Common Questions
What are the typical exterior dimensions I should expect for a standard household dryer?
Most standard residential dryers have exterior heights in the 33–43 inch range, widths around 24–32 inches, and depths of 28–34 inches. These figures can vary by model and features like rear vent options or stacking configurations. Always confirm the exact footprint on the manufacturer’s spec sheet and compare it to your measured space.
Typical dryers are about three feet high, two to three feet wide, and a bit under three feet deep. Always double-check the exact footprint from the spec sheet.
Why is exterior footprint more important than drum capacity for space planning?
The exterior footprint determines whether the unit fits in your allocated space, leaves room for a vent path, and allows door operation. Drum capacity affects how much laundry you can dry per cycle but does not reveal installation feasibility. For space planning, start with footprint checks.
Footprint tells you if it fits; capacity tells you how much you can dry at once.
How should I measure for a closet or alcove installation?
Measure the closet height, width, and depth, add recommended clearances for airflow and maintenance, and verify the vent path can exit cleanly. Also check the door swing alignment with any shelving. Record the exact space in inches and compare to the model’s exterior dimensions.
Measure height, width, depth, and ensure door swing and vent path have clearance.
Can I install a dryer with a vent hose longer than the model recommends?
Exceeding a model’s recommended vent length can reduce drying efficiency and raise fire risk. Use straight runs and avoid long, tight bends. If a longer run is necessary, consult the manual or seek a professional installation.
Don’t exceed the vent length the model specifies; long, tight runs reduce performance.
What is the impact of door swing on space planning?
Door swing determines whether you can open the door fully in your space. If clearance is tight, consider a model with a smaller door arc, a side-opening configuration, or a stacked setup to maximize usable space.
Door swing can make or break accessibility—plan around it.
“Accurate dryer sizing is the foundation of safe, efficient operation. When you align exterior dimensions with space and venting, you reduce installation headaches and improve performance.”
Key Points
- Measure the space before choosing a model.
- Only compare exterior footprints, not internal capacity alone.
- Plan vent paths and door clearance with real measurements.
- Consider stacking or closet setups for tight areas.
- Verify all dimensions align with installation guidance from Easy DryVent.