Best Way to Install Dryer Vent Hose: A Practical Guide
Learn the best way to install dryer vent hose with a safety-first, maintenance-focused approach. This guide covers materials, routing, secure connections, and maintenance to maximize airflow, reduce lint buildup, and lower fire risk.

To achieve the best way to install dryer vent hose, follow a safety‑first, no‑nonsense approach. Choose rigid metal ducting, keep runs short with few bends, and securely clamp every connection. This guide covers practical tools, a clear step‑by‑step installation, safety warnings, and maintenance tips to ensure optimal airflow, reduce lint buildup, and minimize fire risk in your laundry area.
Why Proper Dryer Vent Installation Matters
Proper dryer vent installation is not just about getting the dryer to vent air outside; it is a core safety, efficiency, and home-performance issue. A well-installed vent minimizes lint buildup in ductwork, which is a leading cause of dryer fires. It also ensures that hot, moist air, along with any odors or volatile compounds from fabrics, is expelled efficiently, reducing drying times and energy use. Homeowners who neglect vent routing can face backpressure, inefficient drying, and higher wear on the dryer motor. According to Easy DryVent analysis, the safest and most efficient installations use metal ducts, short straight runs, and reliable seals at every joint. In this guide, you’ll learn to plan your route, choose the right hose, and create a tight, code-compliant installation that keeps your laundry area safer and drier in every sense of the word.
As you work, keep in mind that lint is highly combustible. A safe layout reduces creases and folds that trap lint and makes cleaning easier. When you combine good airflow with regular maintenance, you’ll notice faster drying times and fewer overheating episodes, which translates to lower energy bills and longer appliance life. This is the cornerstone of a durable, worry-free dryer system that performs reliably year after year.
The Easy DryVent team emphasizes that safety and practicality must come first. Plan the run to minimize bends, maximize airflow, and avoid penetrating insulated spaces where moisture could condense. If you’re unsure about local codes or complex routing through a finished ceiling or attic, seek guidance from qualified professionals. Small choices early on—like using a rigid metal duct instead of a flexible alternative—can make a big difference in performance and safety.
Tools & Materials
- Rigid metal vent duct sections (3-4 inch diameter)(Keep runs as straight as possible; avoid compression or kinks)
- Semi-rigid metal duct and/ or high-quality flexible metal duct(Use only metal components; plastic or vinyl ducts are unsafe for lint and heat)
- Exterior vent hood with backdraft damper(Ensure damper opens freely and seals well against weather)
- Duct clamps or screws appropriate for metal ducts(Secure joints firmly to prevent air leaks)
- Aluminum foil duct tape (UL181 approved)(Seal all joints to prevent leaks; avoid standard duct tape)
- Tin snips or metal shears(Cut ducts cleanly without deforming edges)
- Measuring tape(Plan run length and placement accurately)
- Safety gear (gloves, safety glasses)(Protect hands and eyes during cutting and installation)
- Level or straightedge(Helpful for ensuring a straight run)
- Caulk or exterior sealant(Seal exterior penetrations to prevent water ingress)
- Ladder or scaffolding(Required for higher routing through attic/ceiling)
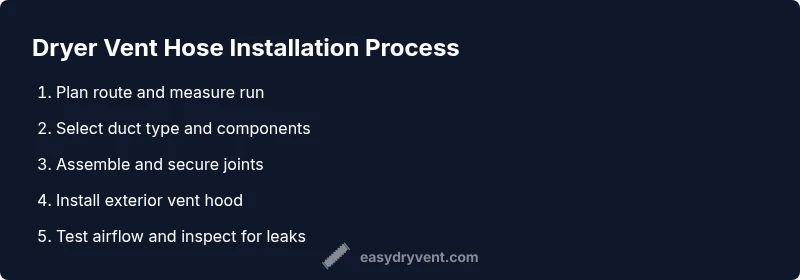
Steps
Estimated time: 60-90 minutes
- 1
Plan route and measure the run
Map the shortest, straightest route from the dryer to the exterior vent. Measure length, count bends, and note any obstructions in attic spaces or walls. A plan that minimizes elbows maximizes airflow and reduces lint buildup.
Tip: Mark the planned path on the wall or ceiling to guide cutting and placement. - 2
Gather materials and safety gear
Assemble all duct components, clamps, foil tape, and exterior vent hardware. Put on gloves and safety glasses before you handle metal parts to protect hands from sharp edges.
Tip: Double-check that you have metal ducts only; plastic or foil-covered ducts are not recommended for safety. - 3
Cut duct sections to length
Cut the metal duct to the measured lengths using tin snips. Avoid leaving jagged edges that could snag lint or cause air leaks; deburr edges as needed.
Tip: Cut slightly longer than measured so you can fine-tune fit during assembly. - 4
Dry-fit the duct run
Connect sections without sealing to verify fit along the planned route. Check that joints align, ends meet cleanly, and the external vent opening is unobstructed.
Tip: If any section doesn’t fit, trim gradually rather than forcing pieces together. - 5
Attach joints and secure connections
Slide joints fully together and secure with appropriate clamps or screws. Tighten firmly to prevent air leaks but avoid crushing the duct. Then seal joints with UL181 foil tape.
Tip: Use foil tape only for sealing; avoid relying on duct tape alone. - 6
Install exterior vent hood and backdraft damper
Mount the exterior vent hood with backdraft damper at the outside wall, ensuring the damper opens under exhaust and closes when not in use. Seal around the hood to prevent water intrusion.
Tip: Clear any snow or debris from the damper regularly during inclement weather. - 7
Test airflow and inspect for leaks
Plug in or power up the dryer and run a short cycle. Check outside vent for robust airflow and listen for unusual whistling or air leaks along joints. Re-tighten or reseal as needed.
Tip: If you smell hot air near joints, shut down and inspect for leaks immediately.
Common Questions
What material should I use for a dryer vent hose?
Metal ducts (rigid or semi-rigid) are preferred over plastic or foil. They resist heat and lint buildup better and meet most code requirements.
Use metal ducts, like rigid or semi-rigid ones, for safety and code compliance.
How long can my dryer vent run be?
Length should be as short as practical with the fewest bends. Local codes and dryer manufacturer guidelines determine exact limits; aim for minimal run and straight routing.
Keep the run short and straight, following local codes and your dryer's guidelines.
Can I seal joints with duct tape?
No. Duct tape alone is insufficient for dryer vents. Use UL181 foil tape and clamps to seal joints securely.
Don’t rely on duct tape alone—use foil tape and clamps for a solid seal.
Is a backdraft damper necessary on the exterior vent?
Yes, a backdraft damper helps prevent outside air, pests, and moisture from entering the home when the dryer isn’t running.
Yes, install a backdraft damper to block outside air when the dryer isn’t operating.
How do I know if my vent is blocked?
Noticeable loss of drying efficiency, longer cycles, or a hot dryer's exhaust can indicate a blockage. Inspect the duct and clean as needed.
If your dryer takes longer than normal and the exhaust feels weak, check for blockages.
Should I hire a professional for vent installation?
If routing requires entering attics, crawl spaces, or roofs, or if you’re unsure about code requirements, a licensed pro can ensure safety and compliance.
If the route is tricky or you’re unsure about codes, consider a pro for safety and compliance.
Watch Video
Key Points
- Plan routes for straight, short runs
- Use metal ducting and professional-grade seals
- Secure joints with clamps and foil tape
- Test airflow and fix leaks before finishing
- Schedule regular vent inspections for safety